While working on the previous blog post, I went on a tangent and tried to solve it by looking a bit more deeply into LLVM architecture. While that tangent was not fruitful for that post, I thought I would write those findings in another!
LLVM is a collection of software tools that can parse, optimize, and link several programming languages into several targets.
The main programming languages that use LLVM are,
- C
- C++
- Rust
- Objective C
- Swift
However, you are free to write your frontend for LLVM for your own programming language. There is even a nice tutorial on how to do that.
The ’targets’ are specific to both operating systems and the underlying microprocessor architecture. While the actual targets it can support is massive, the important ones can be summarized as mac/Linux/Windows over x32/x64/ARM/WASM.
Architecture
While we know as a whole what a tool like clang/gcc/rustc does, sometimes it is useful to understand what is going on underneath. The below is what I figured at a high level what is going on,
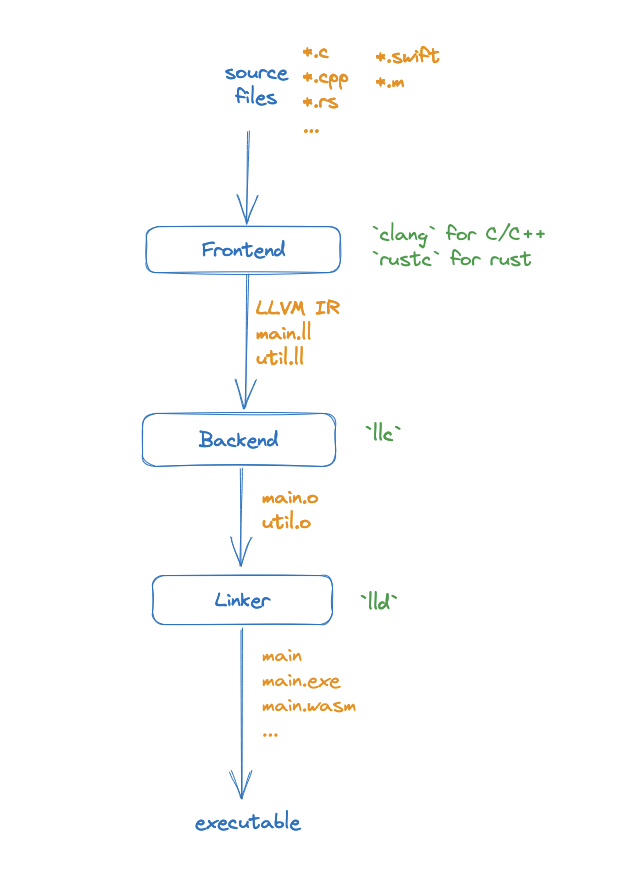
- Frontend : Responsible for parsing, tokenizing and generating an LLVM IR (Intermediate Representation). Generates
*.llfile - Backend : Responsible for optimizing and emitting machine code. Generates
*.objfile. - Linking : Combining multiple object files into a single executable/library that the operating system can understand.
Code Example
What good is a lot of theory if you can’t prove it with code? Let us look at how we can break these steps down in actual practice.
All code shared in this blog is available in this git repo.
First, let me share the simple C program that we will be compiling.
In ./util.h, we have
extern int add(int a, int b);
In ./util.c we have below,
#include "util.h"

int add(int a, int b) {
    return a + b;
}
And in ./main.c, we have,
#include <stdio.h>
#include "util.h"

int main() {
    printf("Hello, clang %d\n", add(12, 3));

    return 0;
}
Setup
We will run this experiment on macOS with the arm64 target (M1 chip). In case you are interested, I have another repository where I did the same for the wasm32 target as well here.
We need llvm tool chain,
$ brew install llvm
Compile and run
To compile and run it in a combined single step,
$ clang -o main main.c util.c
$ ./main
Hello, clang 15
Now we will break this down into different stages and run independently.
Step 1: Frontend
To generate LLVM IR, let us run,
$ clang -S -emit-llvm util.c
$ clang -S -emit-llvm main.c
$ cat main.ll
; ModuleID = 'main.c'
source_filename = "main.c"
target datalayout = "e-m:o-i64:64-i128:128-n32:64-S128"
target triple = "arm64-apple-macosx13.0.0"

@.str = private unnamed_addr constant [17 x i8] c"Hello, clang %d\0A\00", align 1

; Function Attrs: noinline nounwind optnone ssp uwtable(sync)
define i32 @main() #0 {
  %1 = alloca i32, align 4
  store i32 0, ptr %1, align 4
  %2 = call i32 @add(i32 noundef 12, i32 noundef 3)
  %3 = call i32 (ptr, ...) @printf(ptr noundef @.str, i32 noundef %2)
  ret i32 0
}

declare i32 @printf(ptr noundef, ...) #1

declare i32 @add(i32 noundef, i32 noundef) #1

attributes #0 = { noinline nounwind optnone ssp uwtable(sync) "frame-pointer"="non-leaf" "no-trapping-math"="true" "stack-protector-buffer-size"="8" "target-cpu"="apple-m1" "target-features"="+aes,+crc,+crypto,+dotprod,+fp-armv8,+fp16fml,+fullfp16,+lse,+neon,+ras,+rcpc,+rdm,+sha2,+sha3,+sm4,+v8.1a,+v8.2a,+v8.3a,+v8.4a,+v8.5a,+v8a,+zcm,+zcz" }
attributes #1 = { "frame-pointer"="non-leaf" "no-trapping-math"="true" "stack-protector-buffer-size"="8" "target-cpu"="apple-m1" "target-features"="+aes,+crc,+crypto,+dotprod,+fp-armv8,+fp16fml,+fullfp16,+lse,+neon,+ras,+rcpc,+rdm,+sha2,+sha3,+sm4,+v8.1a,+v8.2a,+v8.3a,+v8.4a,+v8.5a,+v8a,+zcm,+zcz" }

!llvm.module.flags = !{!0, !1, !2, !3}
!llvm.ident = !{!4}

!0 = !{i32 1, !"wchar_size", i32 4}
!1 = !{i32 8, !"PIC Level", i32 2}
!2 = !{i32 7, !"uwtable", i32 1}
!3 = !{i32 7, !"frame-pointer", i32 1}
!4 = !{!"Homebrew clang version 16.0.6"}
This generates both main.ll and util.ll independently.
Step 2: Backend
To generate object files, we do,
$ llc -filetype=obj util.ll
$ llc -filetype=obj main.ll
$ ls -alh
total 64
drwxr-xr-x@ 10 anoopelias  staff   320B Aug 27 22:43 .
drwxr-xr-x@ 34 anoopelias  staff   1.1K Aug 27 20:15 ..
-rw-r--r--@  1 anoopelias  staff   480B Aug 27 21:29 Makefile
-rw-r--r--@  1 anoopelias  staff   114B Aug 27 21:08 main.c
-rw-r--r--@  1 anoopelias  staff   1.5K Aug 27 22:40 main.ll
-rw-r--r--@  1 anoopelias  staff   784B Aug 27 22:43 main.o
-rw-r--r--@  1 anoopelias  staff    64B Aug 27 21:08 util.c
-rw-r--r--@  1 anoopelias  staff    31B Aug 27 21:08 util.h
-rw-r--r--@  1 anoopelias  staff   1.1K Aug 27 22:41 util.ll
-rw-r--r--@  1 anoopelias  staff   536B Aug 27 22:43 util.o
This creates main.o and util.o, again independent of each other.
Step 3: Linking
In this stage, the linker will combine the object files along with system library object files into a single executable. This is a slightly complex command since we need to provide that path for system files.
$ ld -syslibroot /Library/Developer/CommandLineTools/SDKs/MacOSX13.sdk \
	-o main \
	main.o util.o \
	-lSystem /opt/homebrew/Cellar/llvm/16.0.6/lib/clang/16/lib/darwin/libclang_rt.osx.a
This generates the executable main, which we can run,
$ ./main
Hello, clang 15
Phew! That was easy! 😀
Summary
So yeah, with such a flexible product like LLVM, you can break down a compilation command into its parts. Not only in theory but also in practice!
Credits: Excalidraw